
Law School Personal Statement Formatting: What You Need To Know
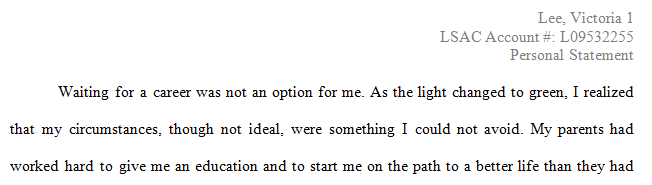
This is what your finished law school essay should look like when properly formatted.
If you were wondering how to format your law school personal statement, this is how it should be done. Please note that we are using Microsoft Office’s Word 2010 to make our formatting adjustments, so if you have a different version of Word or are using another word processor, the procedure may be slightly different. However, the end result should be the same.
Format Guidelines
Your law school personal statement should abide by the following formatting guidelines:
- 0.5 inch indentations
- 0 pt space Before each line
- 0 pt space After each line
- Line spacing should be Double
- Don’t add space between paragraphs of the same style
- 1.0 inch margins on all sides
- 12 pt Times New Roman font
- Justified Alignment (Optional)
Header Format
As we discussed previously in our Personal Statement Header Format article, your document should contain a header in the upper-right corner of every page. It should include:
- Your Last Name, First Name right-aligned
- Page Numbers on each page
- Your LSAC Account Number
- Document Type (Personal Statement)
- Finally, leave a line blank below your header to create a space between it and your body text on the proceeding lines.
Step-by-Step Formatting Walkthrough
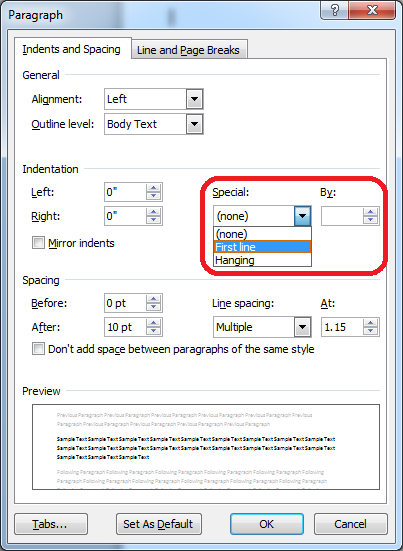
First, you are going to want to right-click in the body of your document (i.e. you should no longer be in your header). Then select Paragraph to open up the paragraph formatting options screen.
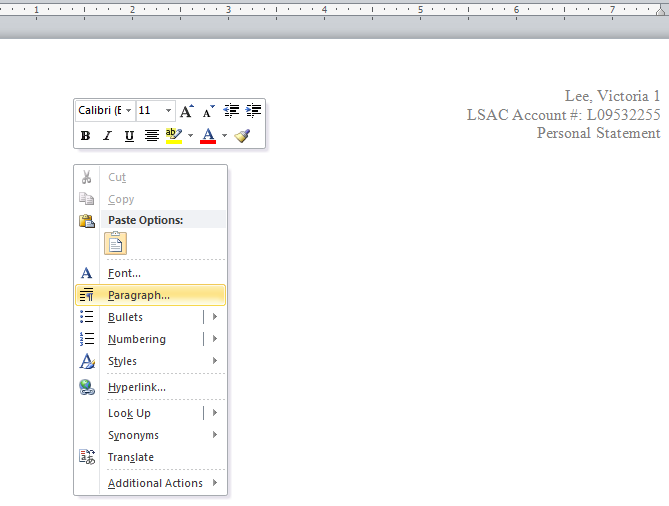
Make sure you are on the Indents and Spacing tab. You will be changing the defaults for four options on this screen.
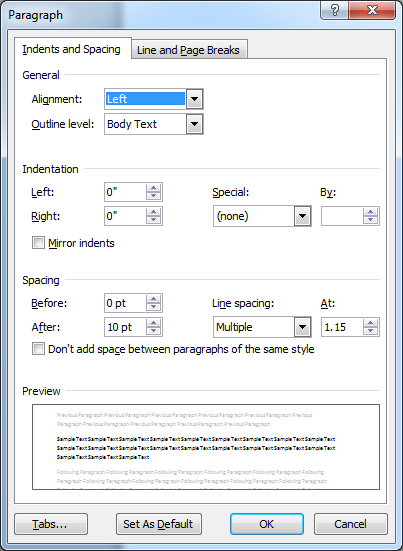
First, under Indentation, click where it says (none) under Special. Select the option called First line. This will automatically indent the first line of every paragraph by a half inch. If it does not default to 0.5″ under By:, then use the down or up arrow to adjust until the indent is set to 0.5 inches.
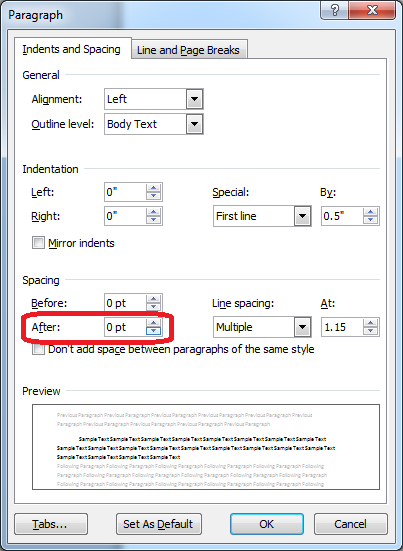
Next, under Spacing, click the down arrow next to After: until you reach 0 pt. This will get rid of any space that would automatically be added after each line of text in your body paragraphs. Make sure that both Before: and After: are set to 0 pt, as you do not want any extra space before or after each line.
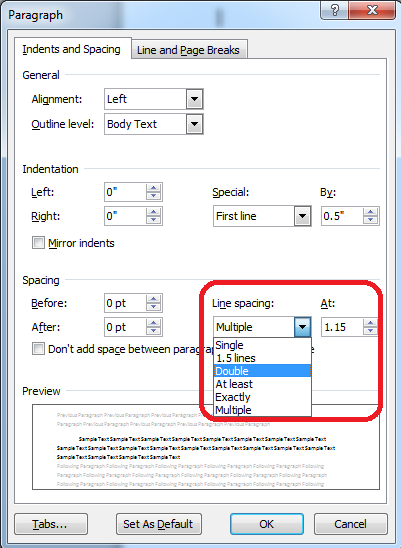
Under Line Spacing, click the dropdown arrow and select Double. This will make your body paragraphs double-spaced.
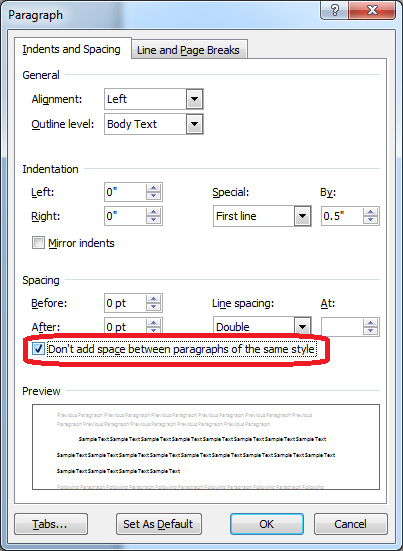
Then, click the check box to Don’t add space between paragraphs of the same style. Click OK to accept all changes thus far.
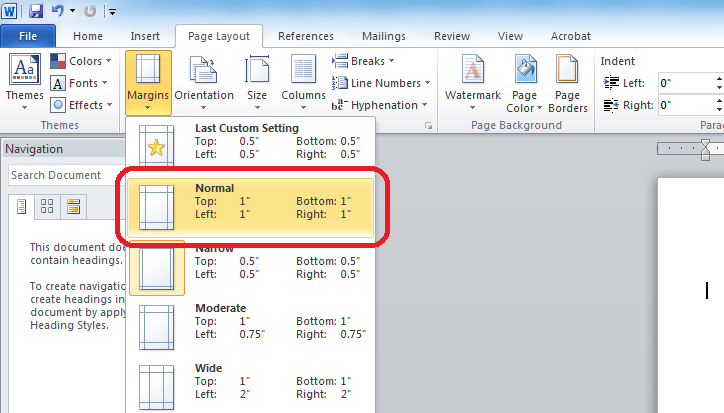
Next, click the Page Layout tab. Click the Margins box, and select Normal, which should be one-inch margins on all sides. Otherwise, go down to the bottom of that menu and click Custom Margins. There, you can manually change each side to one inch.
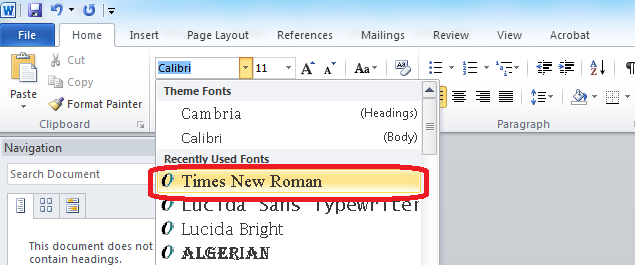
Click the Home tab. Select the font option and click on Times New Roman. You may have to scroll down a bit in order to see this if Times New Roman isn’t in your Recently Used Fonts box.
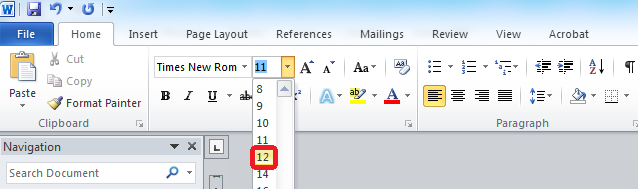
Next, click the font size box. Select 12 pt.
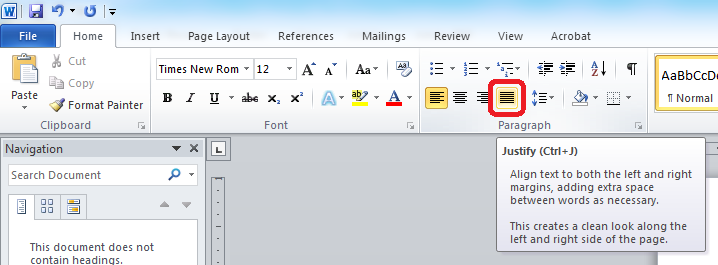
Finally, we suggest changing your text alignment to Justify. Although not required, we believe justified body paragraphs look better and are easier to read. This last step is optional however. Left-alignment is on by default if you choose not to make this change.
We suggest adjusting your document’s formatting first before you begin writing your essay. This way, you will be more aware of how much space you have for your story from the beginning. This is important as being able to accurately determine how long your story will be with the correct formatting will allow you to focus on refining your story without wasting extra time and energy later. Otherwise, you can spend hours writing more or less than you should be—only to find out later that you have to delete or add large parts of your story in order to match your formatting after you’ve already finished writing! Don’t do this. Format first!
After you have your formatting completed, remember to keep your writing within the page limits set in your law school’s application document requirements. Keep this in mind as you write your essay, as it will allow you to focus your ideas and stay concise. Page limits will differ from law school to law school. Typically, your personal statement should be about two-pages double-spaced. However, be sure to check with each law school’s website to which you are applying and always cross-reference this information with what appears on the Law School Data Assembly Service (LSDAS) on the LSAC website (LSAC.org). The information contained on LSAC’s Credential Assembly Service (CAS) should have the most up-to-date information for each school.
Gradvocates Law School Personal Statement Editing
We make sure you have a proper formatting when we thoroughly review and edit your personal statement document. Click here to learn more about Gradvocates law school personal statement editing services, and check out the rest of our blog for tips and relevant information to help you throughout the application process.
If you need assistance with making any of your other law school application documents the best they can be, check out our law school application document editing services or contact us if the document you need help with is not listed on our website.
We hope this information was helpful. Feel free to share and link to this article, and be sure to join the discussion below.